
4 Easy Homemade Halloween Costumes
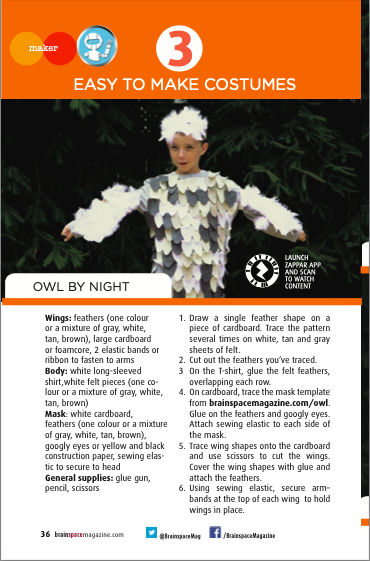
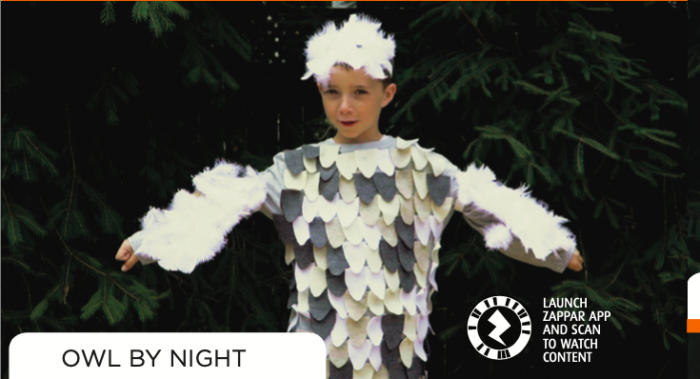
Owl By Night
Wings: feathers (one colour
or a mixture of gray, white, tan, brown), large cardboard
or foamcore, 2 elastic bands or ribbon to fasten to arms
Body: white long-sleeved shirt,white felt pieces (one co- lour or a mixture of gray, white, tan, brown)
Mask: white cardboard,
feathers (one colour or a mixture of gray, white, tan, brown), googly eyes or yellow and black construction paper, sewing elas- tic to secure to head
General supplies: glue gun, pencil, scissors, mask template (google)
1. Draw a single feather shape on a piece of cardboard. Trace the pattern several times on white, tan and gray sheets of felt.
2. Cut out the feathers you’ve traced.
3 On the T-shirt, glue the felt feathers, overlapping each row.
4. On cardboard, trace the mask template. Glue on the feathers and googly eyes. Attach sewing elastic to each side of the mask.
5. Trace wing shapes onto the cardboard and use scissors to cut the wings. Cover the wing shapes with glue and attach the feathers.
6. Using sewing elastic, secure armbands at the top of each wing to hold wings in place.
Scan the image below using the ZAPPAR app to watch a tutorial on this costume!
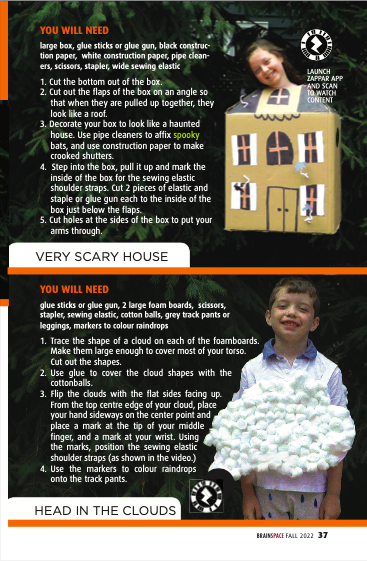
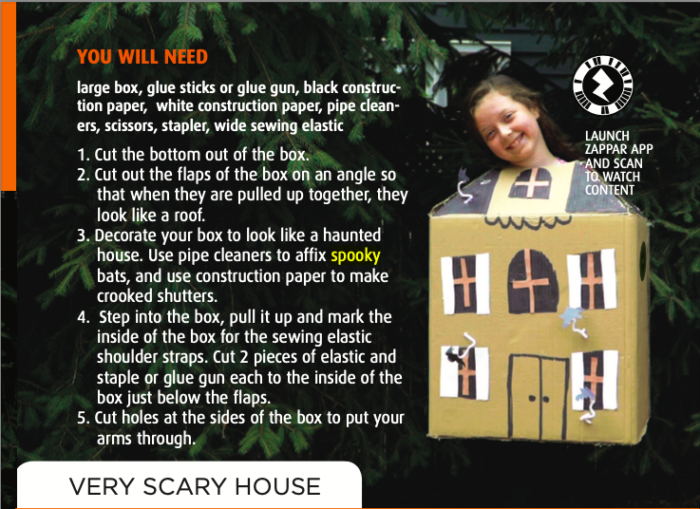
Very Scary House
YOU WILL NEED
Large box, glue sticks or glue gun, black construction paper, white construction paper, pipe cleaners, scissors, stapler, wide sewing elastic.
1. Cut the bottom out of the box.
2. Cut out the flaps of the box on an angle so that when they are pulled up together, they look like a roof.
3. Decorate your box to look like a haunted house. Use pipe cleaners to affix spooky bats, and use construction paper to make crooked shutters.
4. Step into the box, pull it up and mark the inside of the box for the sewing elastic shoulder straps. Cut 2 pieces of elastic and staple or glue gun each to the inside of the box just below the flaps.
5. Cut holes at the sides of the box to put your arms through.
Scan the image below using the ZAPPAR app to watch a tutorial on this costume!
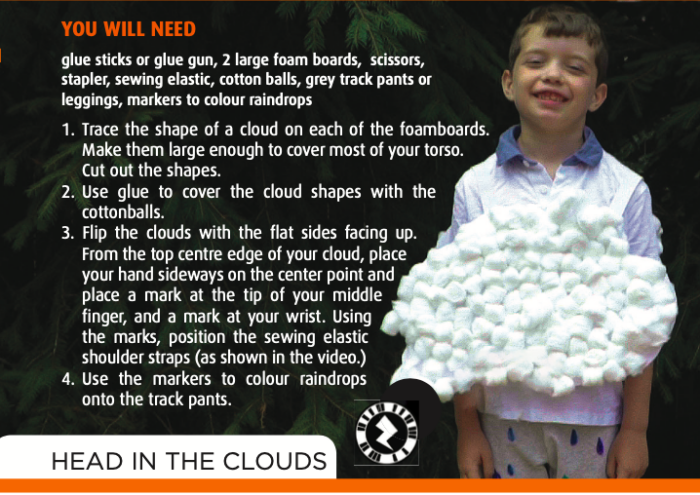
Head In The Clouds
YOU WILL NEED
glue sticks or glue gun, 2 large foam boards, scissors, stapler, sewing elastic, cotton balls, grey track pants or leggings, markers to colour raindrops.
-
Trace the shape of a cloud on each of the foamboards. Make them large enough to cover most of your torso. Cut out the shapes.
-
Use glue to cover the cloud shapes with the cotton balls.
-
Flip the clouds with the flat sides facing up. From the top centre edge of your cloud, place your hand sideways on the centre point and place a mark at the tip of your middle finger, and a mark at your wrist. Using the marks, position the sewing elastic shoulder straps (as shown in the video).
-
Use the markers to colour raindrops onto the track pants.
-
Scan the image below using the ZAPPAR app to watch a tutorial on this costume!
Glowing Jellyfish
Materials
- Large rimmed hat (such as a sombrero, cowboy hat, or sunhat)
- Foam board
- Bubble Wrap (cut into sheets)
- Plastic tablecloth (from a dollar store)
- Variety of coloured ribbon
- Glue gun and glue sticks
- Clear packing tape
- Battery-Powered Twinkle Lights (2 packs)
- Scissors
- Marker
- Exacto Knife
.
Method
- Trace the crown of the hat on the foam board. Ask an adult for help to cut out the traced shape. Mark each corner to cut and remove. The crown of the hat should fit inside the cut out.
- Ask an adult for help to glue the foam board to the hat brim.
- Cut long strips of the different ribbon, about 2-3 ft in length. You can cut all the ribbon strips the same length, or offset the lengths, some shorter and some longer. Ask an adult for help to glue each ribbon strip to the foam board, around the entire perimeter. These will be the jellyfish tentacles.
- Place the tablecloth over the top of the hat. Trim off an excess more than 2 inches from the edge of the foam board all the way around.
- Unwind the battery twinkle lights and string them on the underside of the foam board, taping the battery pack on the back point of the hat. Make sure the switch stays accessible for powering on and off. Repeat this step on the bottom of the foam board with the second twinkle light strand, taping the battery box on the underside of the foam board beside the first battery pack.
- Ask for help from an adult to hot glue all edges of the tablecloth to the underside of the foam board. Leave one side open for stuffing bubble wrap into the “head” of the jellyfish. Make sure not to tape over the battery pack switch.
- Use the sheets of bubble wrap to stuff inside the tablecloth. Once the “head” is stuffed, hot glue the opening closed.
- Power on the battery twinkle lights and try your jellyfish hat on!