A rain gauge is a meteorological instrument used to measure precipitation. You’d likely see one used by a meteorologist or hydrologist (someone who uses scientific knowledge to solve water-related problems) at a weather station. Other names for a rain gauge that you might hear are pluviometer or udometer.
A rain gauge measures the amount of rain that has fallen in one place over a particular amount of time. Scientists use a few types of rain gauges; however, most devices use a cylinder that catches rain. In Canada, rainfall, snowfall, and other precipitation (including drizzle, freezing rain, and hail) are measured using a standard Canadian rain gauge. Precipitation is funneled into a plastic graduated cylinder that is 40 centimetres high and 11.3 centimetres in diameter. At principal weather stations in Canada, precipitation is measured four times a day. Results are recorded and averaged so we have a better idea of how much precipitation we might expect in a given week or month. This data helps meteorologists make weather predictions.
Modern rain gauges sometimes use technology, including sensors that sense when a rain gauge is full and heating that allows gauges to work in very cold temperatures; however,
a simple rain gauge is all you need to measure precipitation at home.
Experiment Below: (Scan this image with the Zappar App)
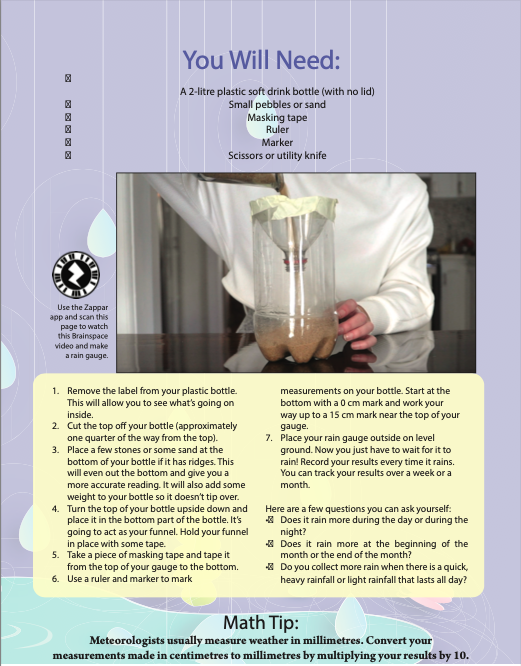
You Will Need:
- A 2-litre plastic soft drink bottle (with no lid) Small pebbles or sand
- Masking tape
- Ruler
- Marker
- Scissors or utility knife
-
Remove the label from your plastic bottle. This will allow you to see what’s going on inside.
-
Cut the top off your bottle (approximately one quarter of the way from the top).
-
Place a few stones or some sand at the bottom of your bottle if it has ridges. This will even out the bottom and give you a more accurate reading. It will also add some weight to your bottle so it doesn’t tip over.
-
Turn the top of your bottle upside down and place it in the bottom part of the bottle. It’s going to act as your funnel. Hold your funnel in place with some tape.
-
Take a piece of masking tape and tape it from the top of your gauge to the bottom.
-
Use a ruler and marker to mark measurements on your bottle. Start at the bottom with a 0 cm mark and work your way up to a 15 cm mark near the top of your gauge.
7. Place your rain gauge outside on level ground. Now you just have to wait for it to rain! Record your results every time it rains. You can track your results over a week or a month.
Here are a few questions you can ask yourself:
● Does it rain more during the day or during the night?
● Does it rain more at the beginning of the month or the end of the month?
● Do you collect more rain when there is a quick, heavy rainfall or light rainfall that lasts all day?Math Tip
Meteorologists usually measure weather in millimetres. Convert your measurements made in centimetres to millimetres by multiplying your results by 10.